(Cover Photo: Mert Börü, December 1986)
Developing video games is a way of life for me. The day I saw River Raid at a local arcade saloon, I knew I was going to spend rest of my life PUSHing and POPing pixels.
If you have ever wondered how people used to develop games during the 80s, please keep on reading this article. I am proud to present you Les Mémoires of a . . . [ehem] . . . [cough!] – OK, I admit it. As far as 3 decades of game development is concerned, “dinosaur” will be the most appropriate word 🙂
Retro is in the air!
It’s quite easy to bump into retro video gaming nowadays. Thanks to the current trend, I have noticed several books, articles and interviews that my former colleagues showed up. I am really very happy to see that researchers finally started shedding some light on the history of video game development. You can read and learn a lot about who the early game developers were, how they started writing games, which company they worked for, how much money they earned, and even where they used to hang around…
With respect to recently published materials, I have different things to tell you. Humbly being a part of the history both as a gamer and a developer, I have witnessed the glory and gore of game development scene in UK. Without falling into the trap of telling cliché technobabble that readers (you) would like to hear, I will assess pluses and minuses of the industry from a very personal point of view. I’ll concentrate on the essential elements of game development workflow from a retro perspective, and try to give specific examples by showing you original works (including both released and previously unreleased materials) that I produced almost 3 decades ago.
Through exposing my personal workflow, exclusive tips & tricks, and particular game development assets, you’ll hopefully get a glimpse of what it meant to be a game developer in those days, and notice that some things never change even after so many years of technological evolution.
![]()
PART I
“Game Design”
Out of nothing
To be honest, game design was the most underrated aspect of video game development during the early 80s. It was the golden age of coding wizardry. In order to come up with new game ideas, developers had to concentrate on squeezing each and every bit of CPU performance by using clever programming tricks. It was a time-consuming process full of trial and errors. Due to limited time and resources, small development teams/companies were naturally more interested in programming, rather than game design. Considering the circumstances, lack of interest in game design was quite acceptable for such an immature industry.
Well-managed video game developers/publishers with good cash flow/sales ratio, like Ultimate, Elite and Ocean (inc. Imagine), were the true pioneers of artwork oriented game design workflow. These companies raised the bar for the entire industry by investing in artwork design. Title screens, menu frames, character designs, level maps and various technical sketches became a part of the production pipeline. These companies proved that spending time/money in game design had more things to offer in return, in addition to multiplied profits;
![]() Well defined story, characters and puzzles
Well defined story, characters and puzzles
![]() Error-proof production chain
Error-proof production chain
![]() Cost-effective workflow
Cost-effective workflow
![]() Reusable artwork for advertising & promotion
Reusable artwork for advertising & promotion
Regarding the efforts mentioned above, I literally witnessed the birth of game design in 1985. As a freelancer working for some of the best game development companies in UK, I had the chance of being a part of “the change”. It was inevitable, and somehow very slow. It almost took a few years for the contractors to get rid of asking for quick and dirty jobs. At the end of the transition period, in-house expectations were higher than average. In order to serve and survive, I was forced to sharpen my skills, and supposed to deliver more planned, precise and polished works. In terms of self improvement, it was a turning point in my life!
“For 16-bit game development, game design was more than essential.”
In 1987, the trial and error days of game development were gone. As we shifted from bedroom coding sessions to collaborative teamwork meetings, we were also making a transition from 8-bit to 16-bit. The release of Amiga 500 and Atari ST heralded more complex computer architectures, offering faster CPUs, larger RAMs, and custom chips dedicated to specific tasks. In order to develop better games, we had to take advantage of these custom components. At that point, we realized that programming such complex devices required a more systematic approach, which emphasized the necessity of proper game design and documentation. For 16-bit game development, game design was more than essential.
Simple, but effective!
We used to design games using conventional tools; Pen & Paper. Until modern methods emerged during the mid 90s, 2D/3D computer aided design was not a part of game design process at all. Everything was designed manually.
Due to homebrew spirit of early game development era, teams were limited with only 2-3 developers, excluding hired musicians. As a result of the “minimalist” human resource capacity, either the programmer or one of the graphic artists had to take the responsibility of game design process. Most of the time, the guy with adequate artwork skills was the best candidate for the job.
In the heyday of 8/16-bit game development, I served mostly as an Assembly Language programmer. Besides programming, I used to do game design as well, thanks to my less than average technical drawings skills. It was better than nothing, actually. As a multidisciplinary game developer, I had the luxury of conceptualizing a scene in my mind, then sketching it on a piece of paper, and finally coding it. Regarding productivity and efficiency, it was an uninterrupted workflow. – Frankly speaking, being a “one-man-army” has always been fruitful in terms of creativity, as well as payment.
Pen & Paper
Let’s have a look at how we used to design games using pen & paper only. Here comes some of my drawings from the late 80s…
These are the sketches of a physics puzzle for an unreleased Amiga action adventure game that never saw the light of day. It was Spring 1989, when Elite asked me to design & code a puzzle mechanism similar to the one in the opening scene of “Raiders of the Lost Ark” movie. Nothing original in terms of puzzle design, actually. In order to overcome the lack of originality, I decided to concentrate on ‘gameplay mechanics’, and that is simply how I sketched the blueprints below.
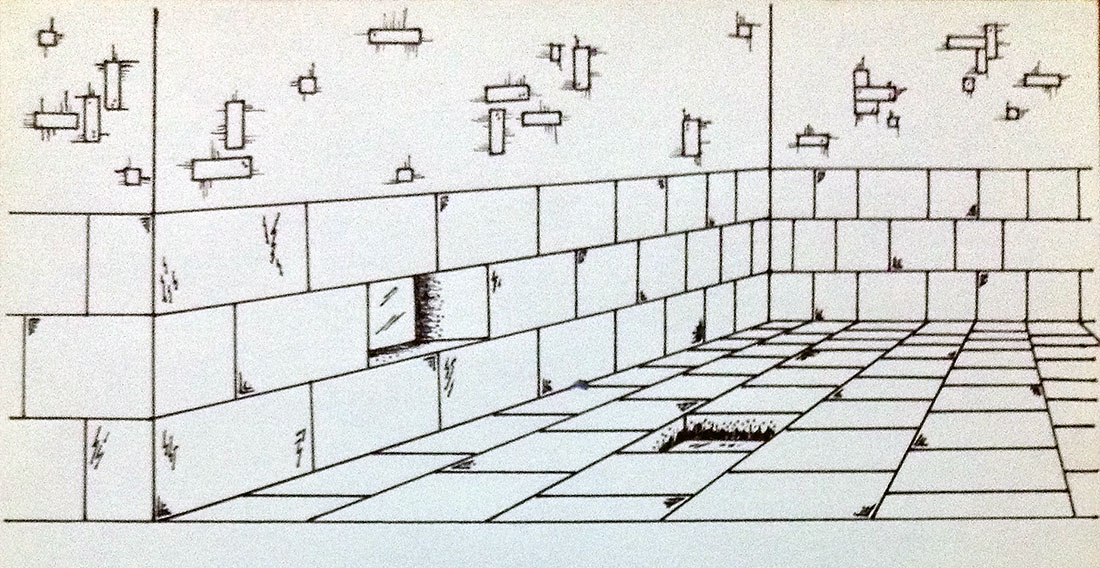
![]() Sketch: “Corridor Puzzle” (1989) – A pseudo 3D representation of temple corridor, with moving wall/floor stones in focus.
Sketch: “Corridor Puzzle” (1989) – A pseudo 3D representation of temple corridor, with moving wall/floor stones in focus.
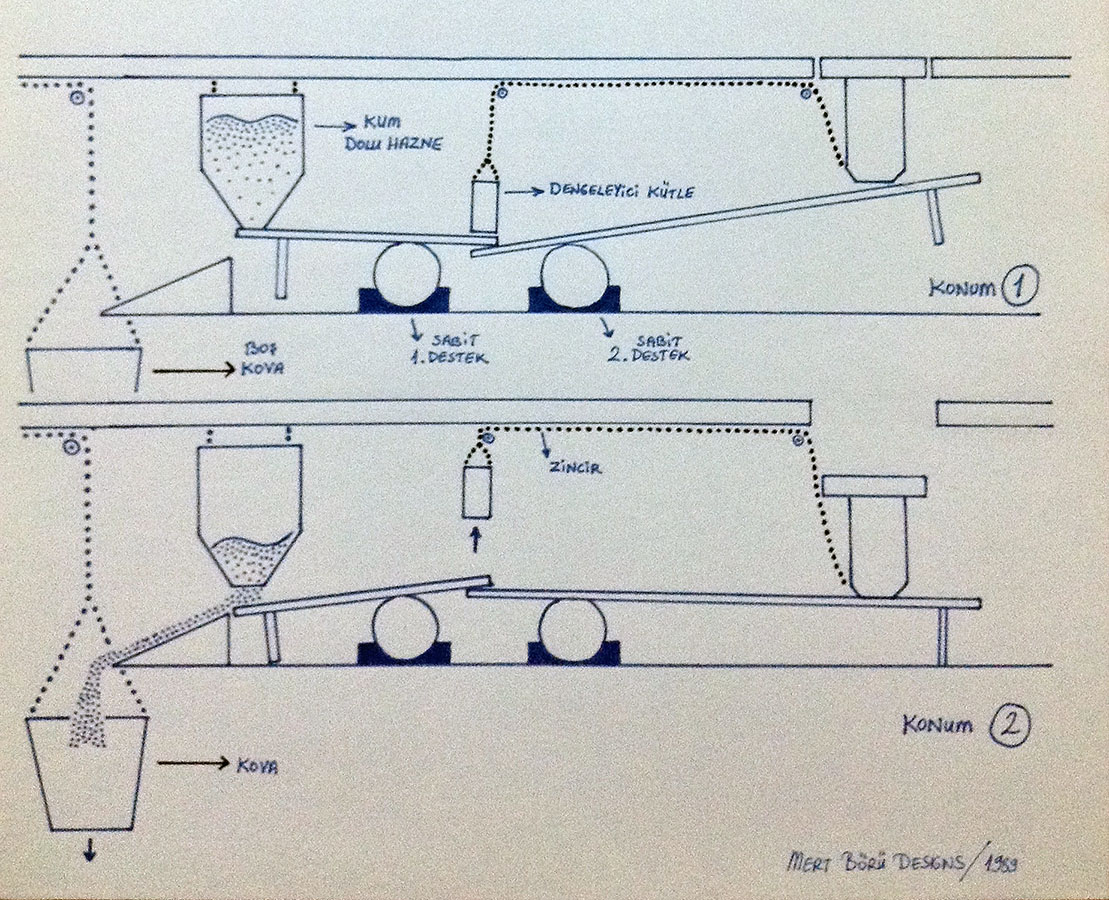
![]() Sketch “Puzzle Detail” (1989) – A 2D representation of the moving floor stone. Upper graph indicates the idle position, and the lower one shows what happens when you step on it.
Sketch “Puzzle Detail” (1989) – A 2D representation of the moving floor stone. Upper graph indicates the idle position, and the lower one shows what happens when you step on it.
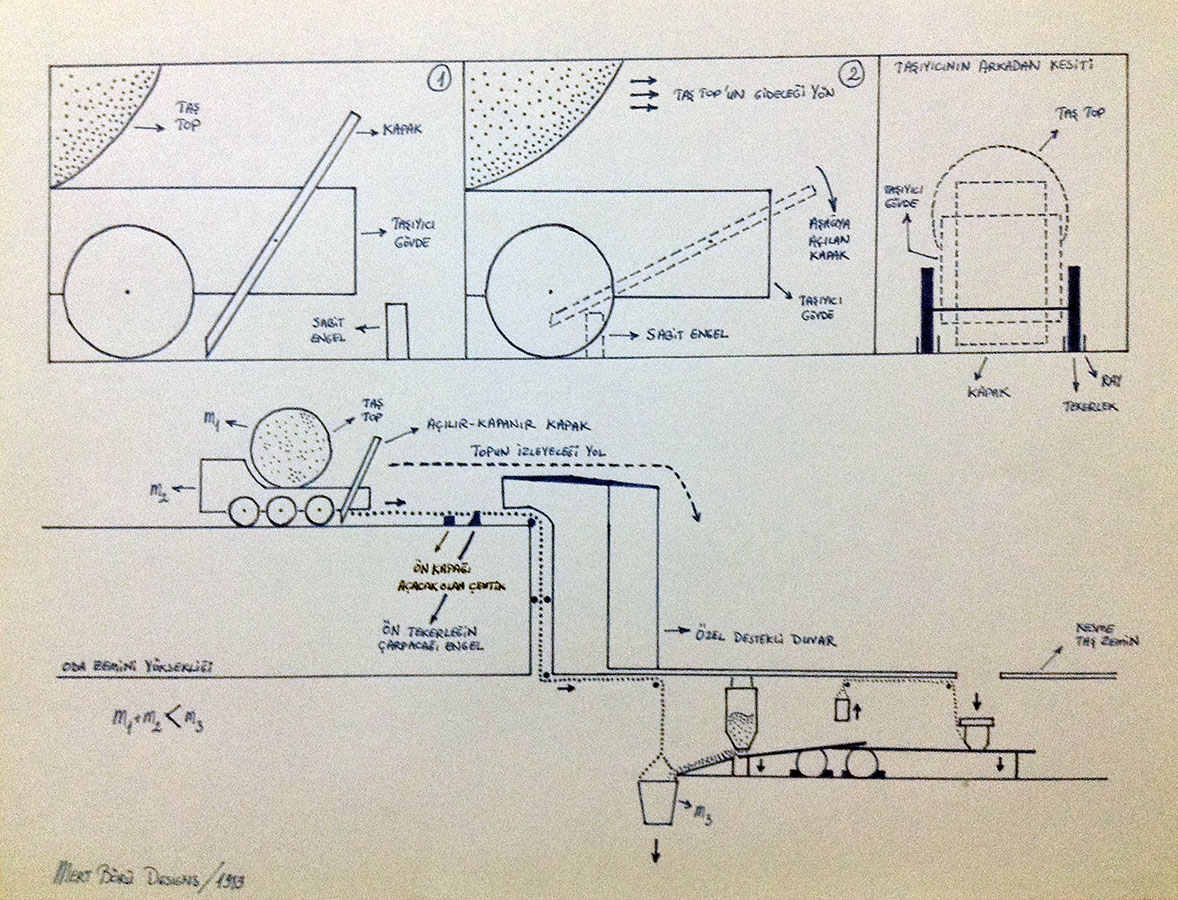
![]() Sketch “Puzzle Overview” (1989) – The big picture, including Sketch 2. Stepping on the floor stone triggers a huge rolling stone ball.
Sketch “Puzzle Overview” (1989) – The big picture, including Sketch 2. Stepping on the floor stone triggers a huge rolling stone ball.
By today’s standards, these drawings obviously look childish. However, considering lack of proper game design documentation routine of the 80s, the amount of detail given to such a simple puzzle is quite high. Appraising the mid/late 80s as a transition period for game development industry – (for leaving egocentric habits of homebrew 8-bit game development period behind, and moving on to team based corporate 16-bit projects) – these sketches clearly illustrate the importance that Elite had given to quality & professionalism in game design process during that time.
Since this was the preview of the design, I kept the rough copies in Turkish for myself, and delivered the final version in English to Elite. I no longer have the latest version. – The game was cancelled due to budget shortfall. Something so natural in those days. 😉
Game design goes hand in hand with artwork design. Two different disciplines so close, so related to each other. As a game designer, it was inevitable for me to do artwork as well…
![]()
PART II
“Artwork”
Back to the 8-bit days
In the early 80s, I used to draw on semi-transparent graph papers using colour pencils. Working on these glossy, oily and super-smooth graph papers had many advantages.
Assuming each tiny box on the graph paper is a pixel, the workflow was quite creative and self-intuitive. Contrary to sitting in front of a TV set and trying to a paint a pixel on a blurry screen while squeezing my eyes, – (yep, we had no monitors in those days, computers were connected to regular TV sets!) – drawing on a piece paper was more natural for me.
Thanks to semi-transparency of graph papers, it was very easy to copy the image underneath. If the original image had the same size of a graph paper, it was super easy. If not, the original image had to be scaled to graph paper size. As I had no luxury of using a xerox machine in the early 80s, I had to do it manually. It was a painstaking process.
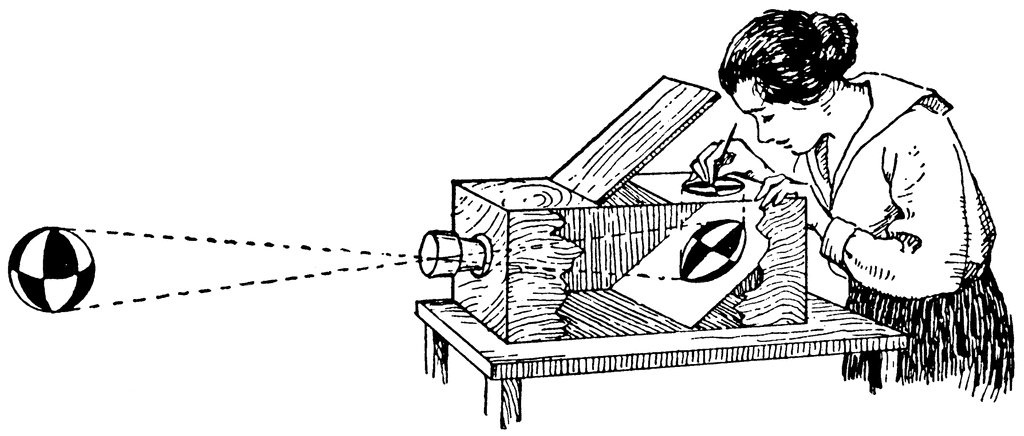
I can clearly recall the day when my dad advised me to use an ancient photography technique… As I was drawing faint reference lines on the original image and manually scaling the image on to the graph paper, he looked at me and said; “Why don’t you place the original image at a distance where you can look at it through the graph paper?” – He helped me building 2 wooden frames with adjustable paper clippers on them, and it worked like a charm! I used this technique for most of the artwork I did for Ocean and Coktel Vision. A few years later, I had a clear conception of the principle; it was camera obscura 🙂
The downside of using graph papers was time consuming paper-to-computer transfer process. I had to paint each pixel one by one. As you can imagine, counting painted boxes on a piece of graph paper and painting the same amount pixels on to the screen of a humble Sinclair ZX Spectrum was quite tough.
This time consuming process was quite simplified when I switched to an attribute (colour) clash free Amstrad CPC 464. I wrote a very simple tool capable of moving a crosshair (cursor) on screen using cursor keys, painting a pixel by pressing Space, and switching to the next colour by pressing Enter. – Simple, but effective.
“Life is really simple, but we insist on making it complicated.” – (Confucius)
Worth a thousand words
In order to capture the essence of the era, let’s have a look at some of my 8-bit sketches from the mid 80s.
All sketches are drawn on graph papers. In order to simplify the copy/scale method that I mentioned above, I have used black for outlines and various colours as fillers. It was –and still is– a very common technique used by anime artists.
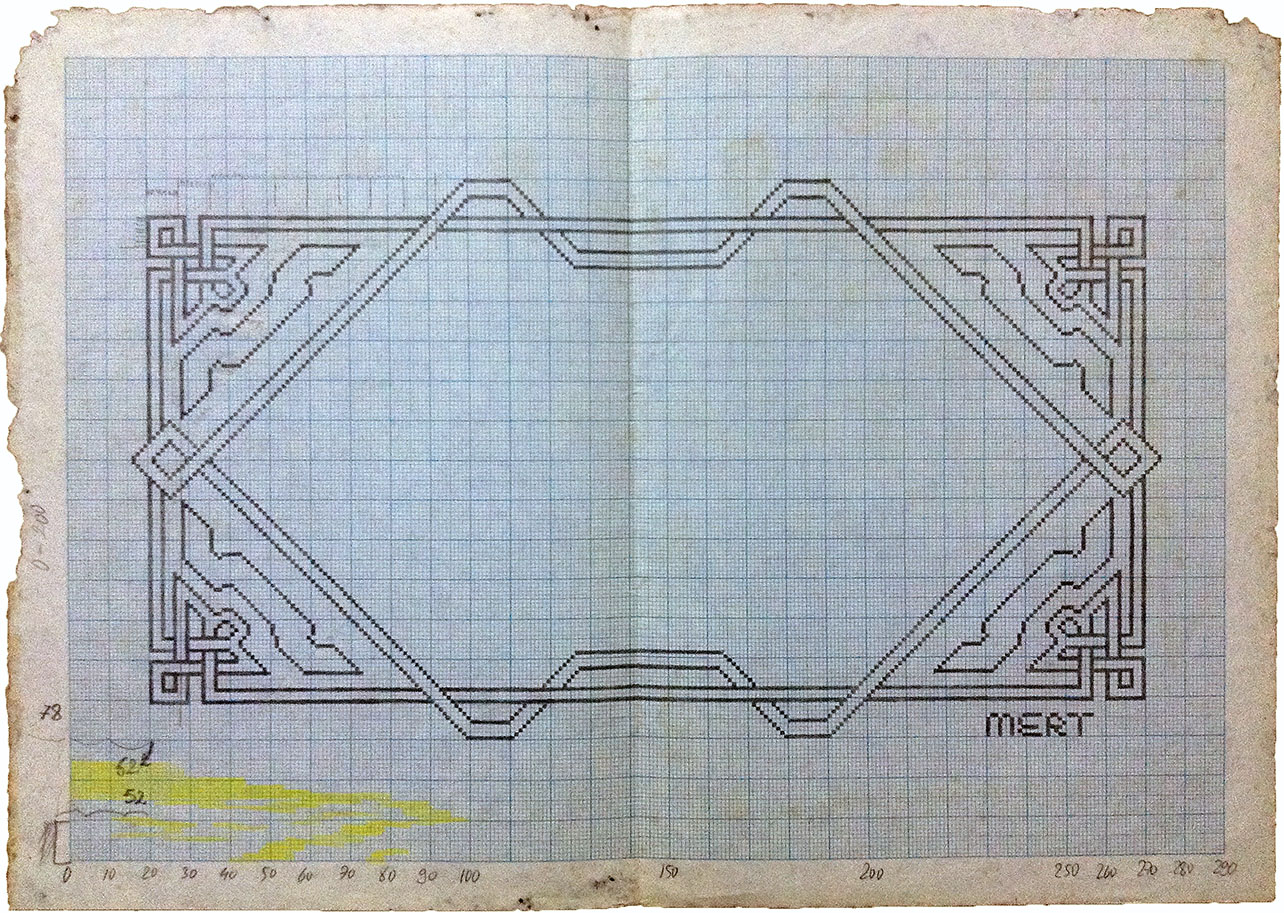
![]() Sketch: “Title Screen Frame” (1985) – Outsourcing generic artwork to freelancers was a time/cost effective method for most game development companies. This is one of my “template” Sinclair ZX Spectrum title screen/menu frames that I designed for Ocean. I did it in a modular way, so that it can be precisely divided into 4 quadrants. Without saving the whole image, it can be easily regenerated from a single quadrant by flipping and copying in both x/y axis. A good example of memory efficient menu frame design.
Sketch: “Title Screen Frame” (1985) – Outsourcing generic artwork to freelancers was a time/cost effective method for most game development companies. This is one of my “template” Sinclair ZX Spectrum title screen/menu frames that I designed for Ocean. I did it in a modular way, so that it can be precisely divided into 4 quadrants. Without saving the whole image, it can be easily regenerated from a single quadrant by flipping and copying in both x/y axis. A good example of memory efficient menu frame design.
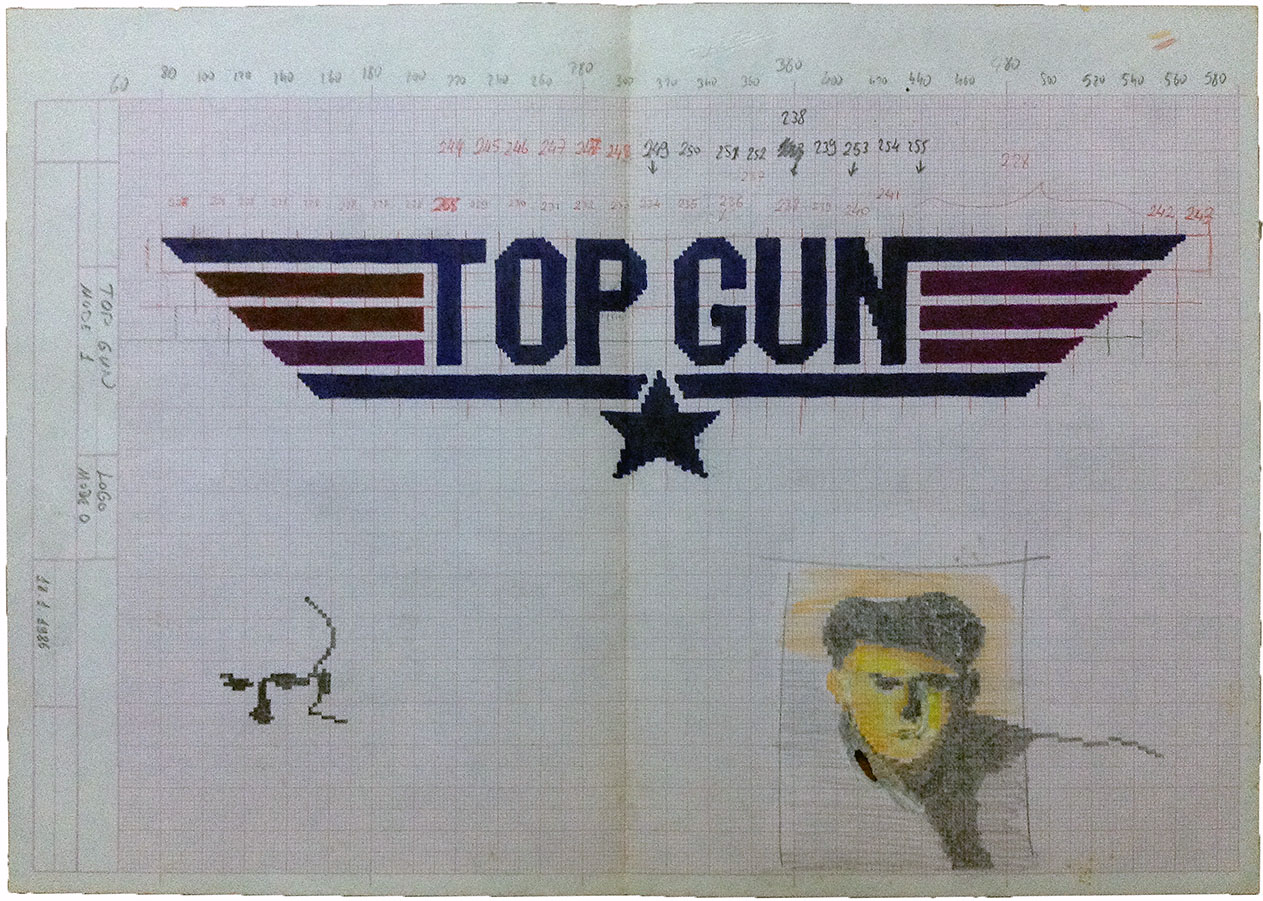
![]() Sketch: “Top Gun” (1986) – The very first sketch of Top Gun logo and title screen. It was used as is on Ocean’s “Top Gun” release for Sinclair ZX Spectrum and Amstrad CPC. Below the logo, you can clearly see how I started sketching Tom Cruise using a very limited number of colour pencils for better Amstrad colour palette compatibility. The final version illustrating the famous Kelly McGillis and Tom Cruise pose was hand-delivered to Ocean. Greetings to Mr. Ronnie Fowles for his great multicolour Mode 0 conversion on Amstrad CPC loader screen.
Sketch: “Top Gun” (1986) – The very first sketch of Top Gun logo and title screen. It was used as is on Ocean’s “Top Gun” release for Sinclair ZX Spectrum and Amstrad CPC. Below the logo, you can clearly see how I started sketching Tom Cruise using a very limited number of colour pencils for better Amstrad colour palette compatibility. The final version illustrating the famous Kelly McGillis and Tom Cruise pose was hand-delivered to Ocean. Greetings to Mr. Ronnie Fowles for his great multicolour Mode 0 conversion on Amstrad CPC loader screen.
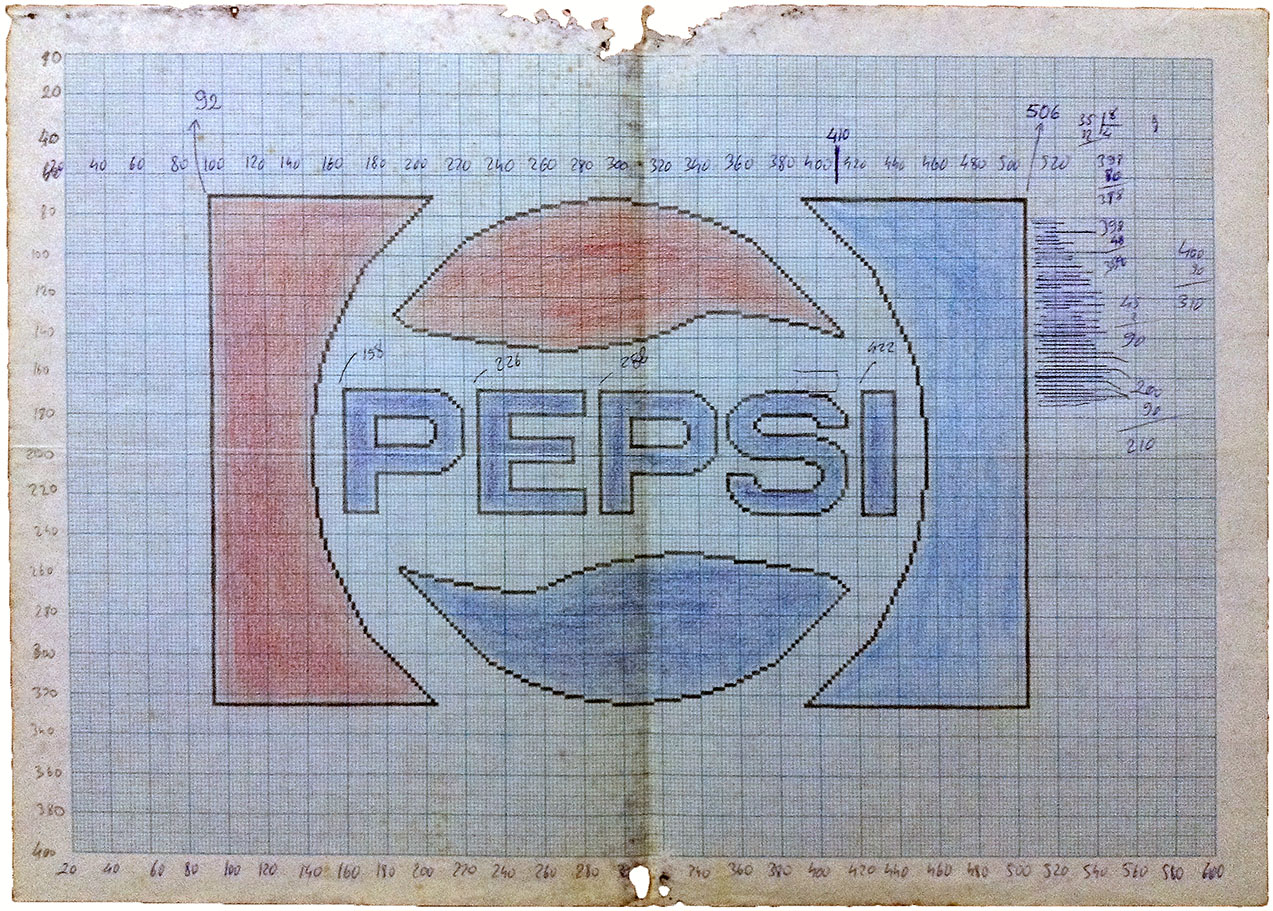
![]() Sketch: “Wec Le Mans” (1986) – Speaking of car racing games, switching to a new colour palette and changing the billboards along the highway was a proven method for creating “new level” illusion! In order to simplify the process of developing rapid level/scene variations, I designed many generic billboards similar to this one, including a 4 colour Ocean billboard later used in “Wec Le Mans”. For conversion requirements, I was asked to design the Pepsi billboard to be compatible with both Sinclair ZX Spectrum and Amstrad CPC. – Apologies for the bad condition of this sketch. I am afraid, some parts of it has been eaten by Kiti, my guinea pig 😉
Sketch: “Wec Le Mans” (1986) – Speaking of car racing games, switching to a new colour palette and changing the billboards along the highway was a proven method for creating “new level” illusion! In order to simplify the process of developing rapid level/scene variations, I designed many generic billboards similar to this one, including a 4 colour Ocean billboard later used in “Wec Le Mans”. For conversion requirements, I was asked to design the Pepsi billboard to be compatible with both Sinclair ZX Spectrum and Amstrad CPC. – Apologies for the bad condition of this sketch. I am afraid, some parts of it has been eaten by Kiti, my guinea pig 😉
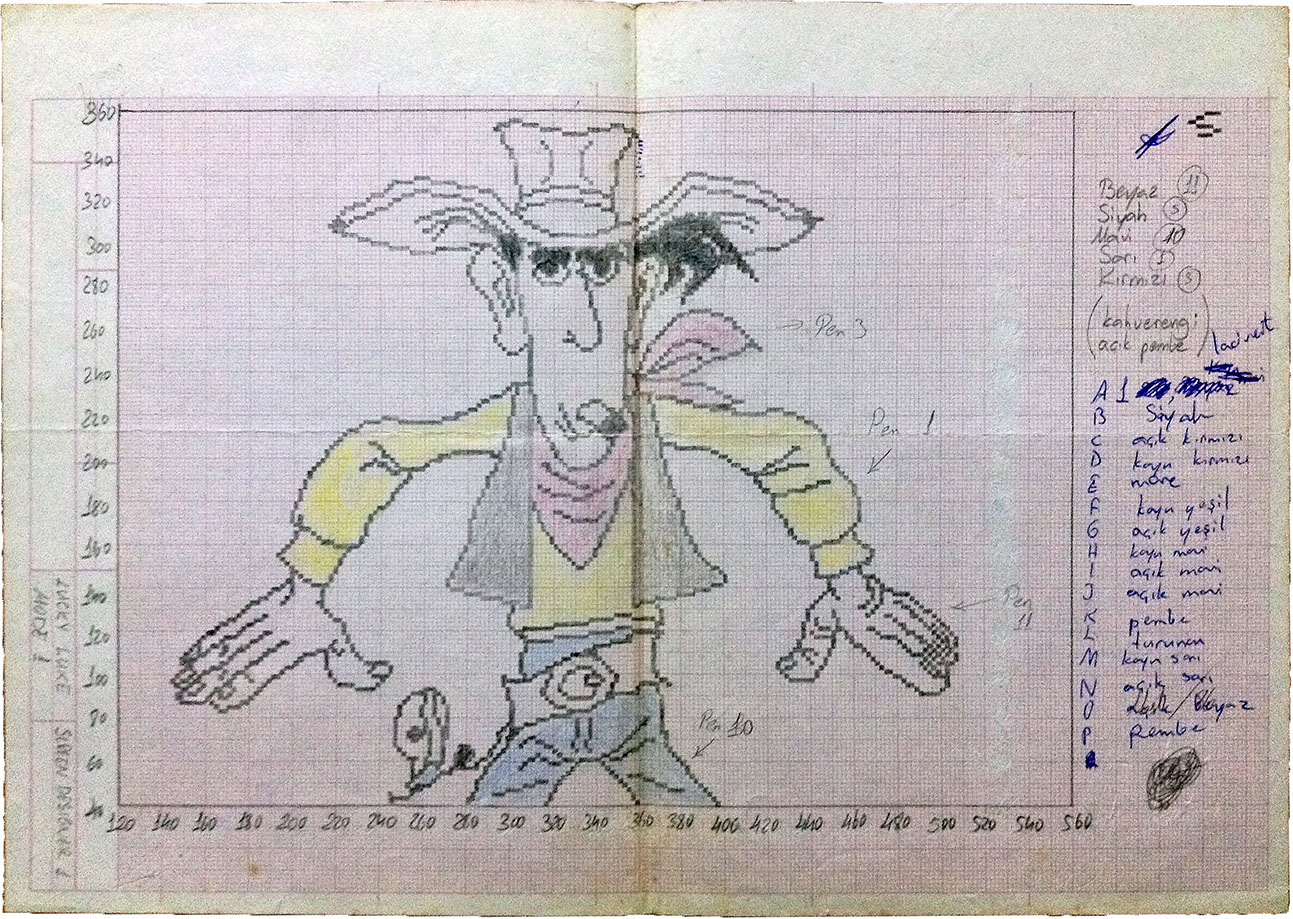
![]() Sketch: “Lucky Luke” (1986) – This is the Amstrad CPC title screen that I designed for “Lucky Luke – Nitroglycerine”. Halfway through the development schedule, Coktel Vision decided to convert the game from Mode 1 to Mode 0. Due to time constraints, I preferred sketching 3 more Lucky Luke images from scratch, instead of converting this one. All published, except this one.
Sketch: “Lucky Luke” (1986) – This is the Amstrad CPC title screen that I designed for “Lucky Luke – Nitroglycerine”. Halfway through the development schedule, Coktel Vision decided to convert the game from Mode 1 to Mode 0. Due to time constraints, I preferred sketching 3 more Lucky Luke images from scratch, instead of converting this one. All published, except this one.
Beyond 8-bit
When I switched from 8-bit to 16-bit, using Deluxe Paint on an Amiga was a larger-than-life experience; something similar to driving a Rolls Royce maybe. Plenty of colours, crop tools, adjustable brush sizes, cycling colours, and no graph papers. More than a dream!
Today, I have the luxury of using a colour calibrated multi-touch Wacom Cintiq tablet. It is absolutely a “what you see/draw is what you get” experience. Truly way beyond painting pixels on a 4 MHz Amstrad CPC, but quite similar to Deluxe Paint when using it with Adobe Photoshop. – Well, at least for me.
No matter what kind of equipment I use, still stick to the 8-bit spirit within me. It’s not what you’ve got, it’s how you use it.
![]()
PART III
“Programming”
A subjective definition
Programming is black magic. It is the use of computational “powers” for selfish game development purposes. By definition, more close to heresy than engineering 😉
Joking apart, programming is the melting pot of game development. Just like cooking, it is more than mixing ingredients. Programming amalgamates different types of assets and makes them look as “one”, so that the game will be greater than the sum of its parts.
First things first
During the early 80s, we used to code a proof of concept (a working copy of game with dummy graphics) before doing anything else. Coding a working prototype was at the top of our to-do list. Even the game design phase was one step behind it. I know, it sounds bizarre today, but it was actually a way of ensuring gameplay quality and testing technical limitations at the very beginning of the project. We used to sit in front of the TV set for days, play with the proof of concept, add/remove features, and make it more modular so that we can come up with tweakable ideas here and there. Due to technical limitations of 8-bit home computers, we had to guarantee a smooth gameplay experience right at the beginning of the project.
“Theory without practice is unacceptable.”
Nowadays, this is considered wrong! Regarding huge development companies releasing AAA games with budgets soaring to multiple hundreds of millions of dollars, programmers meet and argue for weeks without writing a single line of code. They don’t start coding until everything is clearly written down on the game design document. Yes, this method certainly makes sense for some projects. However, no matter how many weeks you spend for writing a game design document, if your proposal doesn’t make sense in terms of programming, I’m afraid you have a big problem. I have seen many promising projects that looked super great on paper, but didn’t work at all. Speaking of video game development, theory without practice is unacceptable.
Double Trouble
Back in the good old days, we used to chase two goals for achieving a great gameplay experience:
![]() Fun factor
Fun factor
![]() Playability
Playability
Games with both factors maximized were considered “successful”. If you pay attention to 8-bit classics, such as Donkey Kong, Manic Miner, and Knight Lore, you’ll notice that there is something more than what you see on the screen. They’re addictive. Despite the aged chunky graphics, there is something special that makes us hooked on these games!
Yes, it is the precise combination of fun and playability.
“Above all, video games are meant to just be one thing: Fun for everyone.” – (Satoru Iwata, Nintendo CEO)
Even today, I stick to this formula. I try to design and produce games with these factors in mind. Sometimes, I’m criticized for making too much of these factors, which I really don’t mind at all. I know that it works all the time 😉
Nobody taught me how to write games. So, how am I so sure about these two relic success parameters?! What makes me think that this formula works even after 3 decades?
Well, let me tell you the whole story then…
The Age of Innocence
I started programming on a Sinclair ZX81. I knew that I had to go beyond BASIC, and start programming in assembly language. After realizing the fact that loading an assembler editor to a computer with 1K of RAM was almost impossible without a memory expansion pack, I switched to Sinclair ZX Spectrum with 48K of RAM. HiSoft Devpac assembler was my Swiss Army knife. I was finally able to write more larger and complex codes. After developing a few business utilities for TEPUM, the local distributor of Sinclair in Turkey, I deliberately decided to write games.
Due to lack of engineering and programming books in Turkey, I started disassembling games. Through reverse engineering, I learned that developing a great game required more than proficiency in Assembly language. I became aware of unorthodox programming methods for the sake of code size/speed optimization, and started developing awkward solutions to generic debugging problems, such as using a second Sinclair ZX Spectrum for instant disassembly, full memory dumping to ZX Microdrive cartridges, and disabling ROM page for more low-level control and free space.
The Power of the Dark Side
As I was very comfortable with reverse engineering games, some of my friends started asking me if I could crack this-and-that game, and add a trainer mode (with infinite lives) to it. It was a challenging request. I knew that it was immoral, as well as illegal, but couldn’t resist feeding my hunger for more information. Cracking speed loaders of Sinclair ZX Spectrum games could have been an opportunity for sharpening my skills. So, I said “Yes!”.
It was precisely the Spring of 1985 that I realized I was developing games as a day job, and cracking some other games as a night job – typical Dr. Jekyll and Mr. Hyde case!
Through cracking speed loaders of the original releases, I gathered invaluable information about low-level programming. Then, I started implementing custom loaders for my cracked ZX Spectrum releases. In order to build a good reputation in the warez scene, I wrote various less than 2K intros, and embedded them into my custom loaders. These were mostly tiny technical demonstrations showing off limited capabilities of the Z80 CPU, such as real-time game logo rotators, and silky smooth text message scrollers at 50Hz.
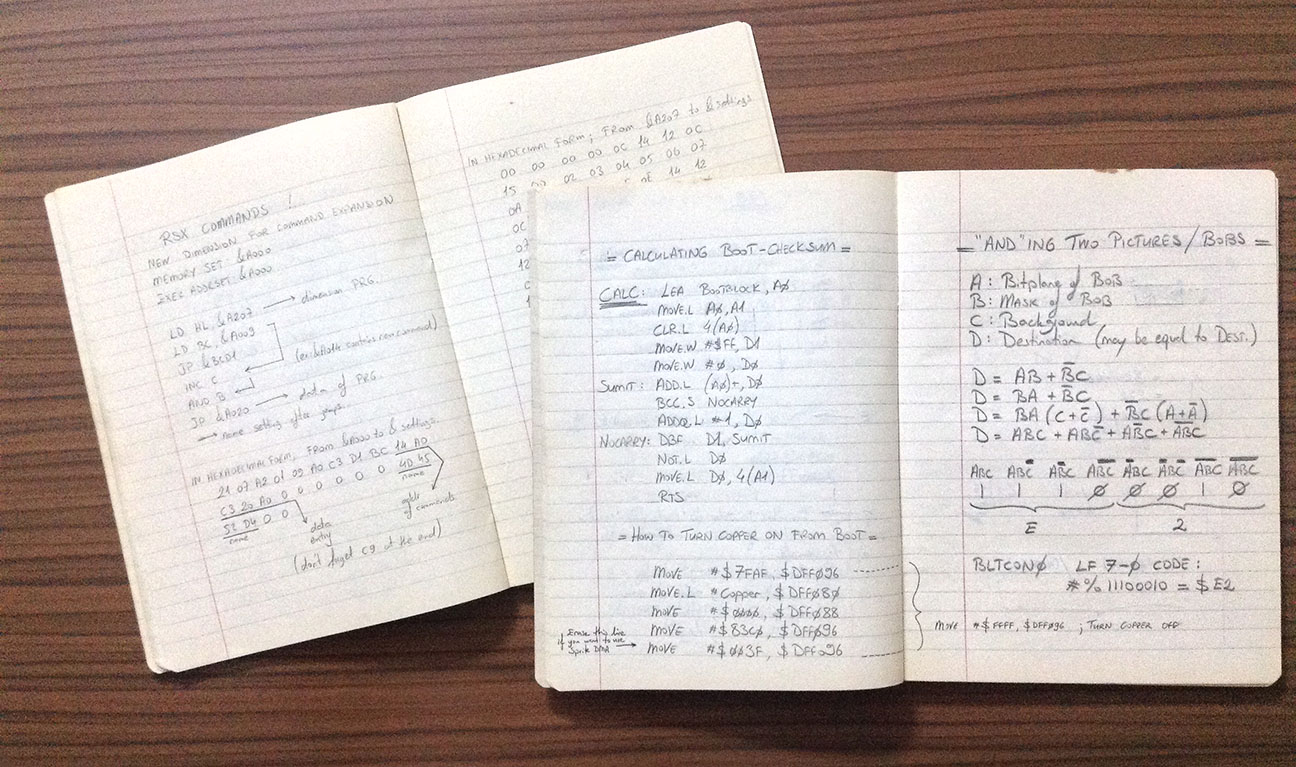
In less than a year, in addition to cracking ZX Spectrum games, I started distributing them as well. It was an opportunity for buying and cracking more games in return. The more I cracked, the better I coded. It was a true vicious circle! The best part of this mind jogging lifestyle was playing games. As a cracker, I had hundreds of games in my library. Inevitably, I used to play for hours and hours. I played so many games that I started taking down notes about my gameplay experience and keeping a list of the things that I liked/hated. In a way, it was DOs and DON’Ts of game design and development. Priceless information! – In addition to these notes, I also wrote down my reusable subroutines and generic piece of codes. A personal database, if I may say so. I still keep those notebooks for nostalgic purposes 😉
[ Although keeping a notebook may sound a bit old school today, actually I still stick to doing so. Instead of working in front of the computer for many hours, I do most of the work on paper, as I sit back at a café and enjoy the sun! ]
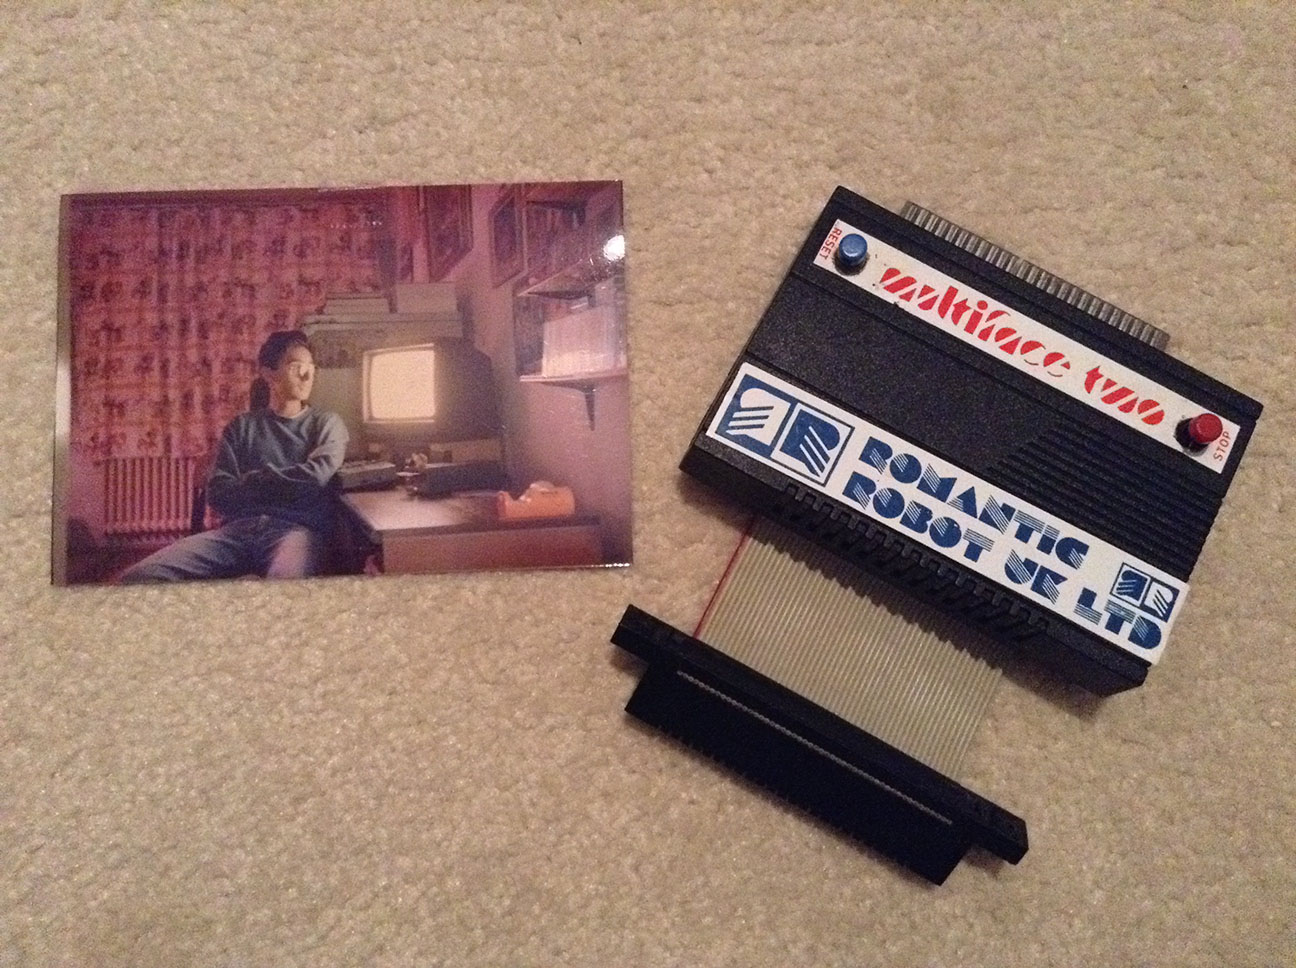
When I switched to Amstrad CPC 464, one of the first things that I did was buying a Romantic Robot Multiface II. Regarding the extra 8K of memory on this device, it was possible to load the dissassembler to Multiface II and get a total of 64K free memory on the computer! This was the opportunity that I was looking for since the days I had used Sinclair ZX81. As a developer, I was finally able to dedicate the whole memory to my games. So, I started using various techniques for developing better games, such as switching 16K banks, off-screen scrolling, and double buffering. Although Multiface II was designed to be a game copier device, I preferred using it as a debugging tool.
[ Despite the general consensus, you weren’t allowed to run dumped copies with anyone else’s machine. Multiface II was copy protected! ]
Speaking of the dark side, I kept on cracking and distributing games; this time for the Amstrad CPC scene! I wrote various checksum protected custom loaders for my cracked Amstrad releases. Lamers couldn’t crack them, naturally. They simply tape-to-tape copied and released them as they were, including my new intros. In a way, they spread the word for me. Through modifying Amstrad games by adding trainer modes and embedding intros, I became so popular that consumers started asking if the game had [cracked by matahari] logo on the game, before buying it. A seal of approval!
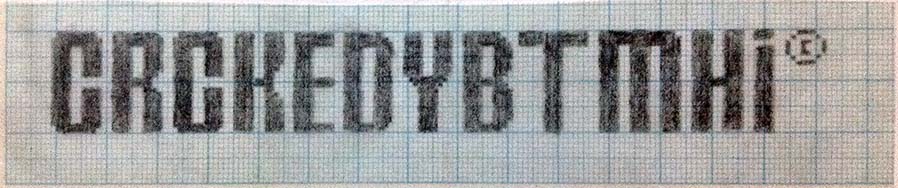
This is the original font that I designed for the logo. It became more and more popular with each release that I cracked and distributed, as it finally turned into my trademark. – OMG, it’s totally unleashed now 😉
The Summer of 1988 turned out to be the peak of my underground career. With the help of a true friend, we dominated the whole local Amstrad CPC game distribution channel. As a result of this fruitful collaboration, my cracked releases were everywhere!
[ Don’t worry, I’ll go into details of that period in an another article ]
So, what the fuss?!
Even after all those years, I can justify the benefits of “disassembling”. To be honest, I wouldn’t be who I am today if I hadn’t cracked games. Today, reverse engineering is a proven method for sharpening programming skills. A piece of cracked code can offer more hidden gems than a technical reference book. – Give it a try, you’ll not be disappointed.
However, a game is more than bits and bytes. Developing a good game requires more expertise than coding subroutines and pushing pixels on to the screen. Many people can show you the technical aspects of developing games, but no one can teach you how to write a great game. I’m afraid, you have to do it by yourself! Play as many games as you can. Concentrate on the gameplay, feel the tension, and analyze the experience you had. Keep a notebook, and take down notes about these analyses. Frequently, review you notes. The more you do this, the more you develop a sense of good and bad. And, that is what I did over the years. – Oh, does that make me a great game developer? Do I really know everything about writing GREAT games? Absolutely not!
I simply know what not to do.
“To know what you know and what you do not know, that is true knowledge.” – (Confucius)
Privacy is everything
During the 80s, I was a humble programmer. With the exception of my family and a bunch of colleagues, nobody was aware of the things that I had been doing for the British game development industry. Unless necessary, I have never exhibited my talent. Even today, I still take advantage of privacy. No publicity, less headaches, more freedom 😉
“The Wise Man chooses to be last, and so becomes the first of all; Denying self, he too is saved.” – (Lao Tzu)
It is also worth mentioning that, I have never been a member of a cracker/scener group. I worked alone. Due to contradictory condition of being both a member of the game development industry and the warez scene, I took a vow of silence and kept things to myself.
What about today?
I stopped all my warez activity in 1990. Since then, I don’t do illegal stuff anymore. No more cracking, no more illegal game distribution… Period.
Alas, still programming video games! I have so many things to learn, and to do. As a programmer addicted to game development, this is a never-ending journey. No time for retirement.
Closing words for Programming
After 30+ years of programming, my perspective towards coding has evolved in a very positive way. For me, programming has become more than engineering; something more close to art!
In case you wonder, let me tell you why…
Independent of programming languages used, programmer creates mathematical patterns using a set of pre-defined building blocks; commands, keywords, opcodes, etc. When we decompose a video game, we can see that it is made up of various complex patterns.
![]() Composite Patterns – (code workflow, state machine)
Composite Patterns – (code workflow, state machine)
![]() Algebraic Patterns – (artificial intelligence, animation)
Algebraic Patterns – (artificial intelligence, animation)
![]() Geometric Patterns – (level design, animation, music)
Geometric Patterns – (level design, animation, music)
![]() Behavioral Patterns – (object oriented programming)
Behavioral Patterns – (object oriented programming)
The interesting thing is, all programmers use the same commands, keywords, opcodes, and somehow come up with unique code patterns. Just like poetry, literature, music, painting… you name it, where the artist uses a limited number of elements (words, notes, strokes, etc.), and comes up with unique patterns for expressing emotions.
Khayyám, Wordsworth, Pynchon, and Hemingway have one thing in common; they all have an understanding of life through art. What makes these people so great is, not because they are genius in mathematics, but because they are capable of expressing emotions using mathematical patterns in a way that common people can understand and appreciate both.
From my point of view, a good game developer should be doing the same thing! – Well, if a video game is all about creating an emotional experience through various mathematical patterns, am I asking too much?
“A mathematician, like a painter or poet, is a maker of patterns. I am interested in Mathematics only as a creative art.” – (Godfrey Harold Hardy, mathematician, University of Cambridge)
All right… ALL RIGHT!
I’ll cut the crap, and go back to the 80s as promised. 😉
![]()
PART IV
“Audio / Sound FX”
More than Chiptune
There are thousands of webpages dedicated to chiptunes produced on 8-bit home computers. If you are interested in retro computer music, I’m sure you have already visited some of these websites, listened to your favourite game tunes, and most probably downloaded them as well. Catchy tunes, earth shattering C64 basses, creepy Spectrum buzzings… I think, we all agree that 8-bit era audio was made up of 3-channel tracker music using “eerie blips-and-blops”.
– “So, 8-bit audio simply means chiptune, right?”
– “Partly true, sir!”
During the early 80s, besides simple waveform generating chips that started chiptune craze, we had sample playback technology as well. Not mentioning the holy-mighty-worthy SID and enormous variants of AY/YM chips, even the humble buzzer of Sinclair ZX Spectrum was capable of playing samples. And yet, sample playback technology was the most underrated aspect of 8-bit audio. Yes, it wasn’t up to today’s standards for sure, but it was better than having nothing!
In terms of gaming experience, it’s worth mentioning that “Ghostbusters” (Activision), “Impossible Mission” (Epyx), “A View To a Kill – James Bond” (Domark), and almost all CodeMasters releases made a real difference thanks to surprising samples embedded within them. “Robocop” (Ocean) and “Jail Break” (Konami) raised the bar so high that, sample playback technology justified itself being restrictively available for 128K versions of games. – Pride of an underrated technology!
Under the Hood
So, how did these companies sample those speeches? You need a piece of hardware that samples your analogue voice and converts to digital using n-bits, right? Simple!
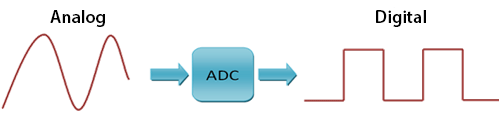
Here comes the tricky part… Do you know any Analogue-to-Digital Converter (ADC) expansion device (similar to Cheetah Sound Sampler released in 1986) for Sinclair ZX Spectrum or Commodore 64 available in 1982?
I am afraid, there was no such device. – So, how did they do it?
Well, most of the time, huge game development companies of the early 8-bit era (Imagine, Melbourne House) used inhouse designed proprietary hardware. These were simple Analogue-to-Digital converter boards inserted into expansion ports of 8-bit home computers. Due to complexity and immature nature, only a few number of employees were allowed to use these special devices.
The 2nd option was getting in contact with ESS Technology, a multimedia company offering electronic speech systems. It was founded in 1984. Same year, both “Ghostbusters” (Activision) and “Impossible Mission” (Epyx) successfully demonstrated that Commodore 64 can actually speak, thanks to an expensive license agreement with ESS Technology.
Last but not least, there was an easier –and cheaper– way of dumping samples into an 8-bit home computer, that many people weren’t aware of… Connecting a ZX Interface 1 fitted underneath a 48K Sinclair ZX Spectrum to a professional audio sampler through the 9 way D type RS-232 serial port connector. – (Huh?!)

During the early 80s, professional audio samplers were widely available in high-end music studios in UK. E-mu Emulator (1981), Fairlight CMI (1979) and Synclavier (1977) were the kings of 8-bit sample era. It was quite easy to hire these VERY expensive devices for a few hours. All you had to do was; ask for a rendez-vous, bring your computer to the studio, sample your speech/music via mighty sampler, connect your computer to the serial port of that sampler, set the baud rate, dump raw 8-bit data within minutes, save it to a disk/cassette, and pay a few £££ for each hour you’ve been there. – Well, that was the easiest part!
When you’re back home, you had to handle the task of squeezing 8-bit sample data to a much lower quality. – (You’re not going to use the whole 64K of memory for a few seconds of speech, right?) – Depending on the number of volume envelope steps available on the sound chip, decimating the sample rate from 17 kHz to 4.7 kHz, and reducing the bit depth from 8-bit to 5-bit would be OK… But how?
Well, that’s the tricky part. You had to know how to downsample, and write a piece of downsampling code in Assembly Language for the humble Z80 CPU. – (Remember, we’re in 1982. No sample editing tools available, yet.) – And, that was simply what I used to do for pocket money during the early 80s. I was in touch with a few game development companies that would literally give an arm for that piece of code. 🙂
“Scientia potentia est – [Knowledge is power]” – (Sir Francis Bacon)
In-Game Usage
Using samples in games wasn’t limited to speech, for sure. It was possible to use musical instrument sounds as well; mostly drum samples. Although a few games tried to use kick (bass drum) samples on menu/title songs, using this trick during gameplay was technically an expensive approach on 8-bit computers. CPU had to take care of the meticulous process. Computer was literally halted until the playback was over. In other words, gameplay had to freeze during the sample playback. – Impractical? Well, not for “The 5th Axis” (Loriciels) programmers! This game certainly demonstrates a clever way of sample playback usage during gameplay.
This limitation was naturally history, when multi-tasking Amiga came up with DMA (Direct Memory Access) driven custom sound chip; Paula. In regards to making sound sample playback without CPU intervention possible, Amiga opened the gates of 4 channel 8-bit sample playback era. It was finally possible to play any sound sample you like during the gameplay, with no hiccups at all.
With the introduction of Amiga 500 in 1987, using sound samples in games became an industry standard. The days of chiptune blips-and-blops were gone. Game developers became more interested in visiting music studios and using pro-audio equipment. It was a next-gen game development era full of hunger for new tools. In other words, a new opportunity for multidisciplinary video game developers, like me.
Regarding the announcement of Sound Blaster audio cards for PCs in 1989, sample playback technology became more than essential for game development. Thinking of the advanced specs, such as 23kHz sample playback, AdLib-compatibility, and MIDI, these were quite affordable cards. – Oh yes, I bought one!
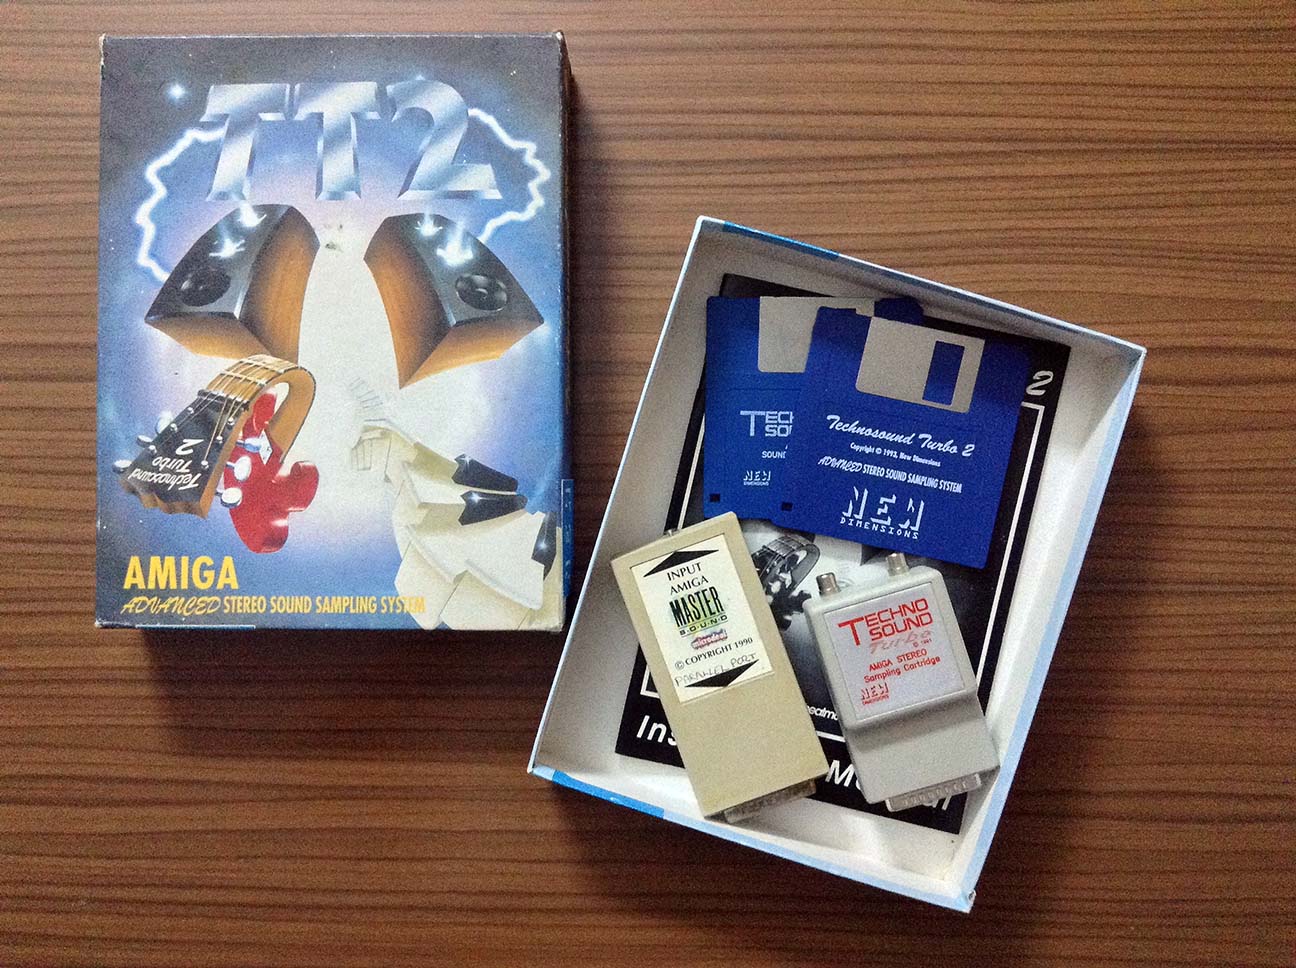 In 1991, I decided to upgrade my modest audio tools to a higher level, for the sake of Core Design projects that I was involved in. I sold my noisy Sky Sound Sampler that I used during the development of “Paradise Lost”, and bought 2 brand new samplers for my Amiga:
- Microdeal Master Sound
- New Dimensions TechnoSound Turbo – (later upgraded to v2)

In addition to these samplers, I bought simply one of the best synthesizers ever produced – a Roland JD-800. It was –and still is– an extremely programmable and a great sounding digital synth with incredible flexibility and control, not mentioning the hefty price! – (A few years later, I bought the rackmount version as well, Roland JD-990. Still regularly using both in my studio.)
As expected, combining high-tech gadgets with old school game development techniques led me to new Amiga and PC game projects. Can you imagine what you could do with an Amiga fully loaded with two samplers, and a PC expanded with a Sound Blaster card that is MIDIed to a Roland JD-800 synthesizer, in 1991?
Well, that’s an another story! 😉
 Even back in 1984, it was a no-brainer process. Before our local post office had a fax machine for hire, I used to contact people by writing business letters and sending them my codes/artwork on


 Similar to LEGO building bricks, I have been coding fundamental elements of “gameplay”. As a result of these coding sessions, I have clearly envisioned a number of next-gen features that can possibly enrich our game.